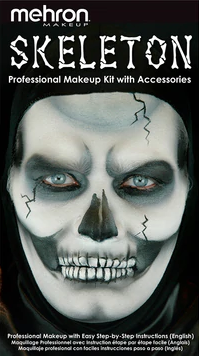
One of the most asked questions we get is how to do easy skeleton makeup for Halloween. Thankfully, skeleton makeup is much easier to apply than it may appear. There are different levels of application, depending on what you are going for, and associated products at varying price levels. However, with the right technique, you can achieve a surprisingly good skeleton effect with some cheap supermarket Halloween-section makeup. All you need is a little white and black face paint and some imagination.
We Recommend the following Skeleton Makeup:

Skull Makeup
To effectively pull off the look of a skull, simply follow the instructions below, and you will soon find that you have sent yourself to the underworld.
- You will start by covering your face with a light layer of white. I usually try not to lay it on too thick. There are two reasons for this. The first is that you will be adding other layers of color on top. The second is that I find that too much white looks surreal and blatantly artificial. I try to keep it subtle to help sell the effect.
- Eye Sockets: You will need to apply black around your eyes, starting around your eyelids. It’s sort of uncomfortable, but the better you can cover your entire eyelid, the more professional the result. From there, slowly expand the black until it reaches the sides of your nose, and up to your eyebrows. You can decide how fare out to take the edge of the eye sockets, but I recommend keeping it around an inch from the outer edge of your eye. Likewise, don’t go too far below your eye, try to keep the black on top of the bags of your eyes (above you’re true eye sockets).
- Nose: This is where you can really vary things a bit. The easiest way to go is to start at the base and cover both nostrils with solid black, and then continue on top, meeting in a sort of triangle. You can then use some creative license and introduce some cracks. Draw thin squiggly black lines heading further up the bridge of your nose to simulate cracks if you choose.
- Mouth: Start by blacking your lips where they meet. Then continue a line off either side of your mouth towards your ears. Then, right past the outer edge of either eye, you can start introducing vertical lines. Space them by about a quarter inch and work your way inward to make your skull teeth. Don’t worry if they aren’t perfectly uniform. You can curve off and connect the tops of some of these vertical lines or leave them open. From a distance it will have the same effect. Then on your cheek, from the outer edge of your eye, and below your cheekbone you can black out this area. It will be the void between the skull and the jawbone.
Watch the video below for a full video tutorial for some additional tips:
Easy Skeleton Makeup – Final Touches
Now that you have you face fully transformed into a skull, you can add some final touches. For example, you can add a blotch of fake blood here or there, especially around the teeth. You can also add some more black squiggly cracks on your forehead or cheeks. Also, you can even add some green or brown dots here and there to simulate moss. Of course, you will want to have a costume to go with your new bad ass skeleton makeup job. Click Here for a full Skeleton Costume, or here for a Grim Reaper Costume.

